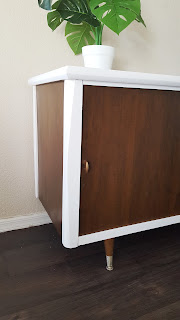
Two tone Mid Century Credenza Makeover
By MAKEunder - March 09, 2018
*Some of the links in this post are affiliate links, which means I receive a commission if you choose to purchase after clicking my affiliate link. This costs you nothing extra, and might actually save you money! I only link to products I know and love, and strive to find you the best price. Thanks for supporting MAKEunder
Back in Vancouver I did a little bit of furniture flipping. I enjoy finding diamonds in the rough and polishing them up (or not if they're already stunning, just undervalued).
I came across this credenza on Facebook marketplace listed for $45. The lady was helping her mom downsize and also had a stunning brass and glass bar cart for $30. I offered $60 for both and suddenly was on my way home with furniture and nowhere to really put it...
So now I've started flipping furniture again and I had forgotten how much I loved it. The thrill of the hunt, the satisfaction of being able to buy groceries...
I decided that since a. there were some places that needed filling and b. it wasn't some fancy, sought after piece, that I could paint it without much guilt.
I filled a couple of spots with wood filler, then sanded down the parts I planned to paint just enough to give the primer something to grab onto, and made sure to wipe them down thoroughly to get rid of any dust.
I did two coats of Bullseye 1-2-3 Primer followed by three coats of Behr Marquee's Fuji Snow. I got two sample jars during Home Depot's paint sample sale back in October because I figured at some point I would need some white paint (and blue, black, two shades of pink, and another two of mint)... so my paint cost me $4 and I still have half a jar left *fist pump*
Behr Marquee is an enamel paint, so it's durable and already pretty glossy, but I wanted the top to be pretty tough and shiny, so I also put on three coats of Minwax Polycrylic.
I then gave the brass knobs a little brightening with some left over Rub n Buff from my lamp makeover.
To finish up and give the wood a bit more life and luster I gave the unpainted parts a once over with some Restore-a-finish in walnut. My favourite way to apply it is by putting a latex glove on, then one of Dr. Science's almost see-through socks over top, dipping just a "toe", applying it all over, and then using my palm to rub off the excess. Then I toss the glove and the sock all in one.
This beauty is now in my new friend Daniel's place, happily storing his vinyl.
I think that's my favourite part of flipping... meeting new people who are going to love my finds just as much as I do.


2 comments
Wonderful beat ! I would like to apprentice while you amend your website, how could i subscribe for a blog site? The account helped me a acceptable deal. I had been tiny bit acquainted of this your broadcast offered bright clear concept.metal wall art wholesale
ReplyDeleteWhat’s Happening i am new to this, I stumbled upon this I have found It positively helpful and it has helped me out loads. I hope to contribute & help other users like its helped me. Good job. melbourne discounts coupons
ReplyDelete